
-
WS Monitor Controls provides direct access to monitor configuration from Windows 10—no more fiddling with awkward hardware buttons. Adjust brightness, contrast, and color temperature right from the desktop. Lowering brightness at night helps reduce eye strain.
Tray & Menu Access
The utility runs in the Windows System Tray (next to the clock). If the icon is hidden under “Show hidden icons”, drag it to a visible spot.
Open the menu with WIN+F3.
The menu provides quick access to display adjustments.
Multi-Monitor Control
Use the on-screen sliders to adjust settings. Hold CTRL while dragging a slider to apply changes to all attached monitors simultaneously.
Command Line Support
WSMonitor.exe /load <name> Load monitor settings from file
WSMonitor.exe /save <name> Save current monitor settings to fileSettings are stored in %APPDATA%\WSMonitor.
Place files in %ALLUSERSPROFILE%\WSMonitor to make them available system-wide.
Hardware Requirements
Control relies on DDC/CI support from the monitor. Some models may not respond, and color temperature adjustment is especially inconsistent across manufacturers. If a setting has no effect, try another temperature value.
[READ ME]
> Press `WIN` + `F3` to open the application menu.See Trouble shooting below when things do not work correctly.
This utility gives you easy access to your display configuration controls directly from Windows. Adjust the monitor’s brightness, contrast and color temperature without having to reach for small and cumbersome physical monitor buttons. Lower the brightness in the evening to prevent eye strain.
The menu of WS Monitor Controls is accessible through the Windows System Tray (the area left to the clock) and gives quick access to display controls. The shortcut for the menu is WIN+F3. If the icon is hidden behind the ‘Show hidden icons’-arrow, you can simply drag it to a visible part of the systray.
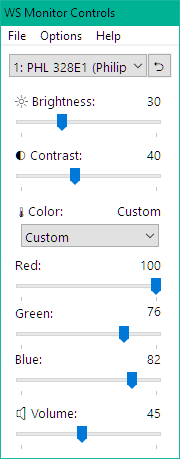
Available controls
- Menu
- File
- Save…
Saves current monitor settings to file - Browse Storage
Open storage folder in Windows Explorer (can be used to delete or rename setting files) - Quit
- Followed by a list of previously saved monitor settings which can be loaded
- Save…
- Options
- Help
- Help…
Show this read-me file - About
- Help…
- File
- Monitor selection drop-down
- Reset Settings button (factory defaults)
- Brightness percentage slider
- Contrast percentage slider
- Volume percentage slider
adjust the volume of the monitor’s build-in speakers, if available. - Input Source selection
DP 1, DP 2, HDMI 1, HDMI 2, DVI 1, DVI 2, VGA - Color Temperature selection
(custom, 4000K, 5000K, 6500K, 7500K, 8200K, 9300K, 10000K and 11500K)- Custom: 3 additional color sliders appear to set the red, green and blue intensity individually.
You can use the usual keyboard keys:
TAB/SHIFT+TABto switch between controls- Cursor keys to select values
Page-Up/Page-Downwith sliders (or click left/right relative from the current position) to increase/decrease value with 10%
When using the sliders you can optionally hold
CTRLto change the value for all attached monitors.Command line usage
WSMonitor.exe command line parameters:
- /load name
Load monitor settings from file - /save name
Save current monitor settings to file
Files are saved to
%APPDATA%\WSMonitor. Optionally you can copy setting files into%ALLUSERSPROFILE%\WSMonitorto make them available to all computer users.Trouble shooting
- Update your video card drivers. Run
compmgmt.mscand navigate to Device Manager/Display adapters to confirm your setup.
AMD: https://www.amd.com/en/support
Nvidia: https://www.nvidia.com/Download/index.aspx?lang=en-us
Intel: https://www.intel.com/content/www/us/en/support/products/80939/graphics.html - Update your monitor drivers. Search the internet using your monitor brand and model number with keyword driver. Download the drivers from the official website. Extract the zip-file; right click on the included .inf file and choose Install. Run
compmgmt.mscand navigate to Device Manager/Monitors to confirm successful installation. - Please be aware that control of attached monitors depends on whether the monitor correctly supports DDC/CI commands. If it does not, it will not be controllable or have issues from any software product. The support of color temperatures varies between monitors. Try another temperature when nothing seems to happen. DDC/CI is sadly a simple standard with wild variety in implementation completeness and correctness.
- Check if your monitor’s settings menu has an option for DDC
Some monitors have a DDC settings that can be enabled/disabled; make sure it is enabled. - Smart Display Monitors
In many cases, DDC is blocked by a monitor setting that tries to take complete control of brightness, contrast or volume. Usually disabling those functions in the monitor settings will allow back control. Set Preset Mode or Picture Mode to Standard or Custom. Look for settings named Magic Bright, Eye Saver, Dynamic Brightness, Uniformity Compensation, Auto Brightness, Bright Intelligence, Dynamic Contrast, Ambient Light Sensor. - When using HDMI-to-USB-C Cables
Sometimes DDC controls are blocked on specific monitors when using HDMI to USB-C cables. If possible, try a DisplayPort to USB-C cable. - Non-compliant hub/dock/adapter
A lot of these hubs block DDC requests completely. If the hub supports more than one monitor, it usually forwards DDC requests to only one of them. - Connection/cable
If you have DisplayPort available, try using it instead of HDMI.
